
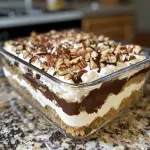
I’ll never forget the first time I encountered Six in a Pan Dessert. It was during a holiday gathering at my grandmother’s house, where desserts were always the highlight. As a child, I was mesmerized watching her layer each component with care and precision. The name always made me smile – six distinct layers, each bringing something special to create a dessert that was greater than the sum of its parts. Over the years, I’ve adapted her recipe, maintaining its nostalgic charm while making it more accessible for busy families. This dessert has become my go-to solution when I need something impressive yet deceptively simple to prepare. It’s the perfect make-ahead treat that always disappears quickly from any potluck or family dinner.
Why You’ll Love This Recipe
I believe Six in a Pan Dessert stands out as a true crowd-pleaser for several compelling reasons:
- Simplicity with a Gourmet Finish: Despite its impressive layered appearance, it requires no baking expertise – just simple assembly.
- Make-Ahead Marvel: I often prepare this dessert a day before serving, allowing the flavors to meld beautifully in the refrigerator.
- Texture Paradise: The combination of crunchy pecans, buttery graham cracker base, creamy cheese layer, and silky pudding creates an extraordinary mouthfeel that’s like a symphony in each bite.
- Customizable Charm: I’ve found that this dessert adapts beautifully to personal preferences, making it perfect for both traditionalists and adventurous eaters.
- Transportable Treat: Whether for potlucks or gifts to neighbors, this dessert travels exceptionally well without losing its visual appeal.
Ingredients for This Recipe
Graham Cracker & Nut Base
- Melted Margarine : I prefer using margarine for its consistent melting properties and subtly buttery flavor that binds the base without overpowering the other layers.
- Chopped Pecans : These add a crucial textural contrast and nutty depth. I always toast them lightly to intensify their flavor, transforming them from good to unforgettable.
- Graham Cracker Crumbs : The foundation of our dessert that creates a buttery, subtly sweet base. I’ve found that homemade crumbs provide a fresher flavor than pre-packaged ones.
Cream Cheese Layer
- Cream Cheese : The creamy backbone that provides a tangy contrast to the sweet layers. I allow it to soften at room temperature for about 30 minutes for the smoothest blending.
- Confectioners’ Sugar : Its fine texture dissolves completely into the cream cheese, creating that silky-smooth middle layer that everyone raves about.
- Frozen Whipped Topping : This multi-tasking ingredient creates lightness throughout the dessert. I’ve learned that patience in thawing makes all the difference in achieving the perfect texture.
Pudding Layers
- Instant Chocolate Pudding Mix : The chocolate layer adds rich depth to the dessert’s flavor profile. I select a high-quality brand for the most intense chocolate experience.
- Instant Vanilla Pudding Mix : This creates a lovely contrast to the chocolate layer while adding a classic, comforting sweetness that balances the tangier elements.
- Milk (3 cups): The liquid that transforms our pudding mixes into silky layers. I use whole milk for a richer mouthfeel, though 2% works beautifully too.
Topping
- Unsweetened Chocolate Square : This is my secret weapon for an elegant finishing touch. The slight bitterness cuts through the sweetness, creating a more sophisticated flavor profile.
How to Make This Recipe
Prepare the Crust
- I start by melting the margarine in a medium bowl until it’s completely liquid but not too hot.
- Next, I mix in the graham cracker crumbs and chopped pecans until everything is evenly moistened. The mixture should hold together when pressed but still maintain a pleasant crumbly texture.
- I press this mixture firmly into the bottom of a 9×13-inch pan, using the back of a measuring cup to create an even, compact layer. This foundation needs to be solid to support all the creamy layers above.
Create the Cream Cheese Layer
4. In a separate bowl, I beat the softened cream cheese until it’s light and fluffy – usually about 2 minutes with an electric mixer.
5. I gradually add the confectioners’ sugar, mixing until completely incorporated and silky smooth. Any lumps now will be visible in the finished dessert, so I take my time with this step.
6. Next, I gently fold in 2 cups of the thawed whipped topping. I use a gentle hand here, maintaining as much air as possible for that dreamy, cloud-like texture.
7. I spread this mixture carefully over the crust, creating a level surface for the next layers.
Mix the Pudding Layers
8. In another bowl, I whisk together the chocolate pudding mix and 1½ cups of cold milk for about 2 minutes, until it begins to thicken but remains pourable.
9. I pour this chocolate layer over the cream cheese layer, spreading it gently to the edges.
10. I repeat this process with the vanilla pudding mix and remaining 1½ cups of milk, creating our fourth distinct layer.
Add the Final Touches
11. I spread the remaining 2 cups of whipped topping over the pudding layers, creating beautiful soft peaks with my spatula.
12. For the finishing touch, I drizzle the melted unsweetened chocolate in a zigzag pattern across the top, then use a toothpick to create elegant swirls.
13. I cover the dessert carefully and refrigerate for at least 4 hours, though overnight is best for those perfectly defined layers and melded flavors.
Expert Cooking Tips
- Perfect Timing: I always make this dessert at least 8 hours before serving. The waiting is worth it – the flavors meld magnificently and the layers set beautifully.
- Temperature Matters: Room temperature cream cheese is non-negotiable for me. Cold cream cheese creates lumps that are impossible to fix later.
- Layer with Precision: I’ve learned to spread each layer gently to the edges before adding the next. This prevents gaps and ensures every bite contains all six delicious components.
- The Cutting Secret: I dip my knife in hot water and wipe it clean between slices for those picture-perfect servings that showcase all the beautiful layers.
- Chocolate Drizzle Technique: For the most elegant finish, I transfer my melted chocolate to a small plastic bag, snip the corner, and pipe it carefully across the top.
Proper Storage
- Refrigerator Storage: I always cover the dessert tightly with plastic wrap to prevent it from absorbing refrigerator odors. It maintains peak freshness for up to 3 days.
- Freezer Option: For longer storage, I cut the dessert into individual portions, wrap each in plastic, then foil. They freeze beautifully for up to 1 month.
- Thawing Method: I transfer frozen portions to the refrigerator overnight rather than thawing at room temperature. This preserves the distinct layers perfectly.
- Serving Temperature: I remove the dessert from the refrigerator 15 minutes before serving. The slightly softened texture enhances the creamy mouthfeel significantly.
Variations and Substitutions
Dietary Adaptations
- Lower Fat Version: I sometimes use Neufchâtel cheese instead of regular cream cheese and light whipped topping to reduce calories without sacrificing too much creaminess.
- Gluten-Free Option: For my gluten-sensitive friends, I substitute the graham crackers with gluten-free cookies or a mixture of almond flour and melted butter for the base.
- Dairy-Free Possibility: When needed, I’ve successfully used dairy-free cream cheese, almond milk for the pudding, and coconut-based whipped topping for those avoiding dairy.
Flavor Twists
- Mocha Variation: I occasionally mix a tablespoon of instant espresso powder with the chocolate pudding layer, creating a sophisticated coffee-chocolate flavor profile.
- Seasonal Fruit Addition: In summer, I love folding fresh berries into the whipped topping layer for bursts of color and freshness that contrast beautifully with the creamy layers.
- Nutty Alternative: While pecans are my go-to, I’ve discovered that toasted hazelnuts or walnuts can transform the base with their distinctive flavors.
What Goes with This Recipe
- Fresh Berries: I serve a small bowl of mixed berries alongside this rich dessert. Their bright acidity provides a refreshing counterpoint to the creamy layers.
- Hot Coffee or Espresso: The slight bitterness of a well-brewed coffee cuts through the sweetness perfectly. I find it creates the most satisfying flavor harmony.
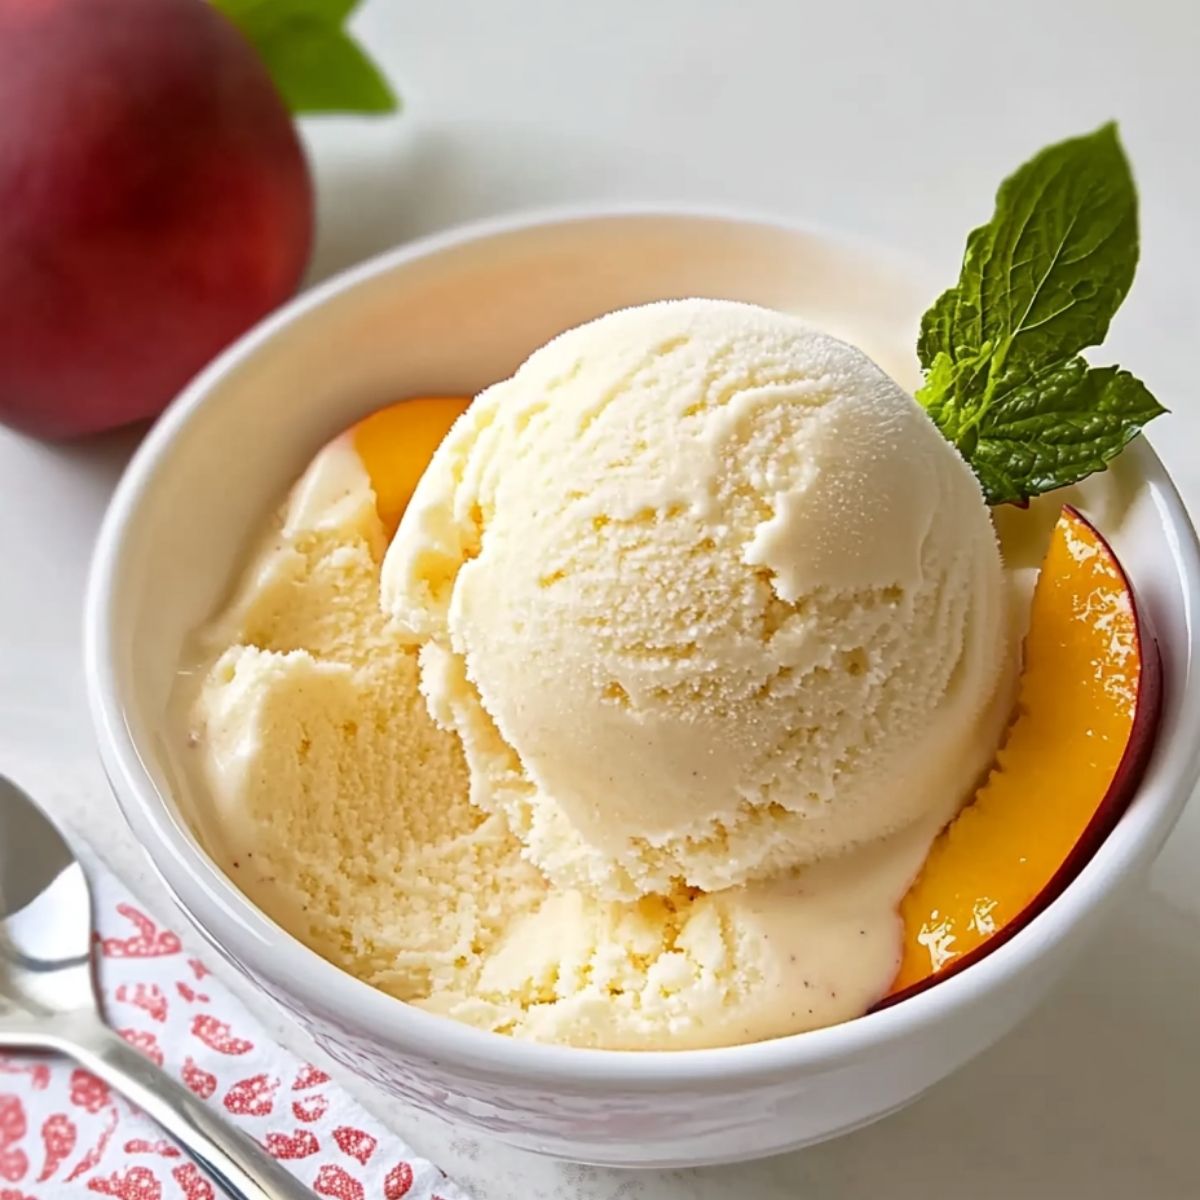
- Vanilla Bean Ice Cream: For special occasions, I add a small scoop of high-quality vanilla ice cream. The temperature contrast with the chilled dessert is absolutely divine.
- Mint Tea: The refreshing herbal notes cleanse the palate between bites, allowing you to experience the dessert’s complexity anew with each forkful.
FAQ
Can I make this dessert ahead of time?
Absolutely! I find it’s actually better when made a day ahead, allowing the flavors to meld beautifully.
Why did my layers mix together?
Each layer needs to set slightly before adding the next. I always wait about 10 minutes between layers for the cleanest results.
Can I use homemade whipped cream instead of whipped topping?
Yes, though it won’t hold as long. I stabilize mine with a teaspoon of cornstarch if using fresh whipped cream.
How do I get such clean slices?
My secret is a hot knife! I run it under hot water, wipe dry, then slice. Clean between each cut for showcase-worthy pieces.
Is there a way to make this dessert less sweet?
I sometimes reduce the confectioners’ sugar to ¾ cup and use sugar-free pudding mixes for a less sweet version.
Six in a Pan Dessert
- Total Time: 4 hours 25 minutes
- Yield: 12 servings 1x
Description
Discover my family’s treasured Six in a Pan Dessert recipe – a no-bake wonder with six heavenly layers of nuts, cream cheese, and pudding that’s surprisingly simple to make yet impressive enough for any occasion!
Ingredients
- ½ cup melted margarine
- 1 cup chopped pecans
- 1½ cups graham cracker crumbs
- 1 package cream cheese (8 ounces)
- 1 cup confectioners’ sugar
- 4 cups frozen whipped topping, thawed
- 1 package instant chocolate pudding mix (3.9 ounces)
- 1 package instant vanilla pudding mix (3.4 ounces)
- 3 cups milk
- 1 ounce unsweetened chocolate, melted
Instructions
- Mix melted margarine with graham cracker crumbs and pecans; press into 9×13-inch pan.
- Beat cream cheese with confectioners’ sugar until fluffy; fold in 2 cups whipped topping and spread over crust.
- Whisk chocolate pudding mix with 1½ cups milk until thickened; spread over cream cheese layer.
- Repeat with vanilla pudding mix and remaining 1½ cups milk.
- Top with remaining whipped topping and drizzle with melted chocolate.
- Refrigerate at least 4 hours, preferably overnight, before serving.
- Prep Time: 25 minutes
- Chilling Time: 4 hours

Leave a Comment